Narrative Through Kinetic Imaging: Time-based media and methods for developing storytelling skills.
- Overview
- Module 1: Montage
- M1_Assignment 1 / M1_Assignment 2
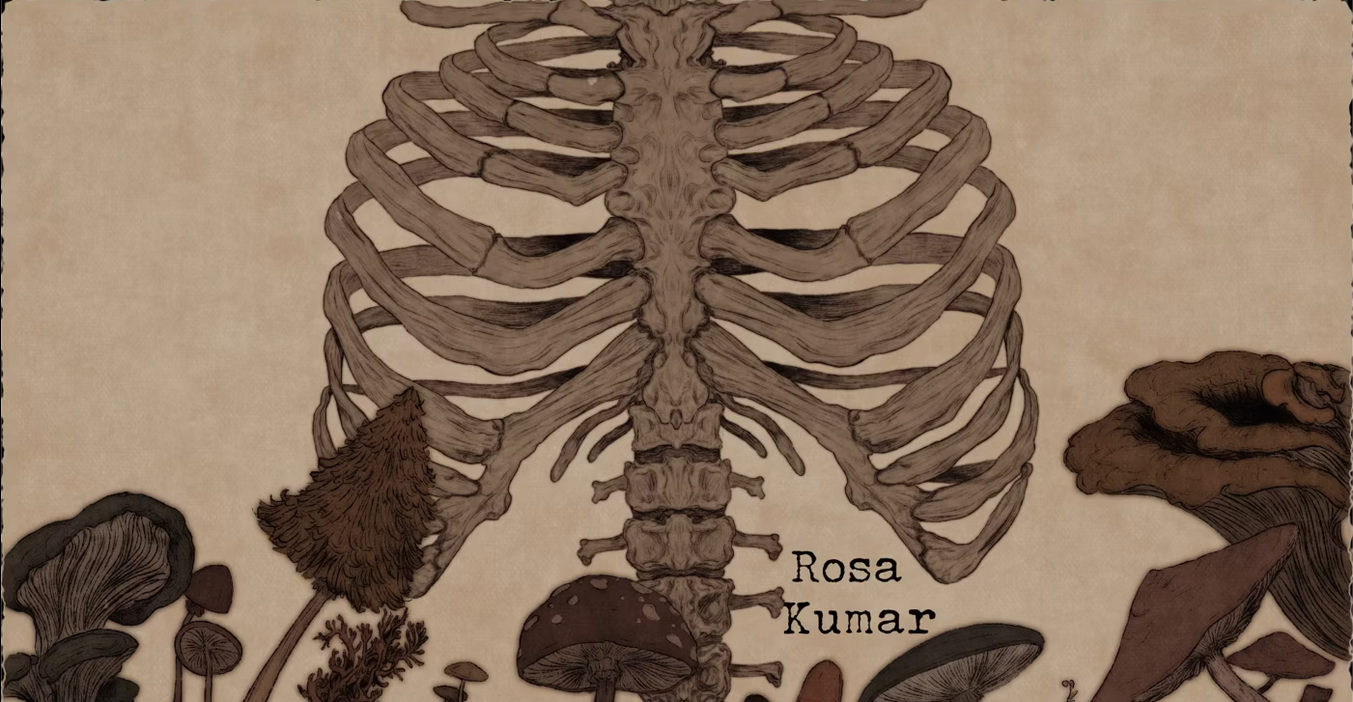
- Module 2: Title Sequence
- M2_Assignment 1 / M2_Assignment 2 / M2_Assignment 3
- Module 3: Stop Motion Amination
- M3_Assignment 1 / M3_Assignment 2
- Module 4: Demo Reel
- M4_Assignment
- Reading List and Reference
- Course Syllabus
Course Description
This course explores narrative development utilizing various methods of time-based media. Film, animation, title sequence screenings, project assignments, and class discussions will be included. Students will be introduced to editing and compositing, animating and creating motion graphics, and Stop-Motion Animation. Finally, they will create a Demo Reel.
Upon completing this course, students will leave with practical tools, ideas, and opinions about storytelling through various time-based media, giving them a foundation for ongoing animation art exploration and expansion beyond the classroom.
Student Learning Outcomes
- Demonstrate skills in the use of industry-standard technologies relevant to animation and video in response to set projects.
- Employ basic principles, concepts, tools, techniques, procedures, and technologies sufficient to produce animation art from concept to a finished product that communicates ideas and stories to viewers or audiences.
- Recognize the principles of animation, including its visual, spatial, sound, motion, and temporal elements and features, and how these elements are combined in the development of animation art.
Course Outline
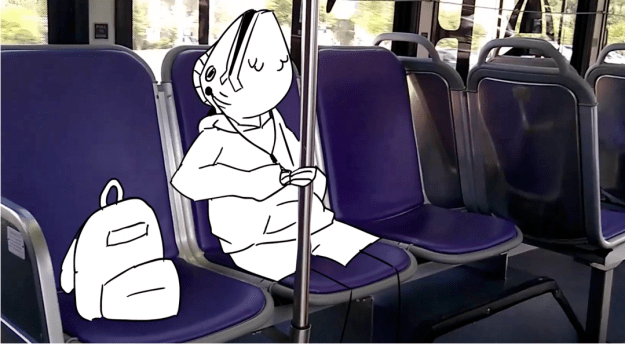
- Montage: Create a 60-second video piece with a sound collage. Tell a story without dialogue, using imagery and sounds.
- Title Sequence: Create a title sequence for a book that has not yet been made into a movie.
- Stop Motion Animation: Create a stop motion animation that is at least 30 seconds long.
- Demo Reel: Craft a 30sec. Demo Reel to showcase your animation work
Module 1 | Montage
Overview
Montage is a French word, translated as a verb, to edit, or a masculine noun, assemble. The word montage has many meanings; when it is used to describe a video/film sequence, montage can be defined as a series of shots, arranged in a particular order for a particular purpose.
In a montage sequence, the shots are arranged so that they follow each other in rapid succession, telescoping an event or several events of some duration into a couple of seconds of screen time. Montage describes a film that is seen as being constructed rather than edited, it is a process in which a number of shots are woven together to communicate a great deal of information in a short time.
Montage may also refer to a style of editing propounded by soviet filmmakers in the 1920s. Russian film directors and theorists Sergei Eisenstein and Dziga Vertov demonstrated the technical, aesthetic, and ideological potentials of montage. Eisenstein believed that film montage could create ideas or have an impact beyond the individual images; that two or more images edited together create a “tertium quid” (third thing) that makes the whole greater than the sum of its individual parts.
Eisenstein’s Soviet contemporary Dziga Vertov harshly criticized Eisenstein’s commitment to narrative film. Nevertheless, Vertov obviously learned from Eisenstein and applied the theory of montage to his documentary ideal of presenting “life caught unaware.” Vertov’s The Man with the Movie Camera (1929) took montage to lengths beyond Eisenstein; indeed, Vertov’s elaborate, often-frenetic montage was unmatched until the era of the music video.
We will look at several examples of montage, starting with Dziga Vertov’s The Man with the Movie Camera, which is an encyclopedia of montage effects. We will also look at Fritz Lang’s M (1931) as well as examples of contemporary montages.
Assignment:
Create a 60-second video piece with a sound collage. Tell a story without dialogue, using imagery and sounds.
You may use action shots, stills, drawings (scanned or digital in origin), and sampled or recorded audio to create your Montage.
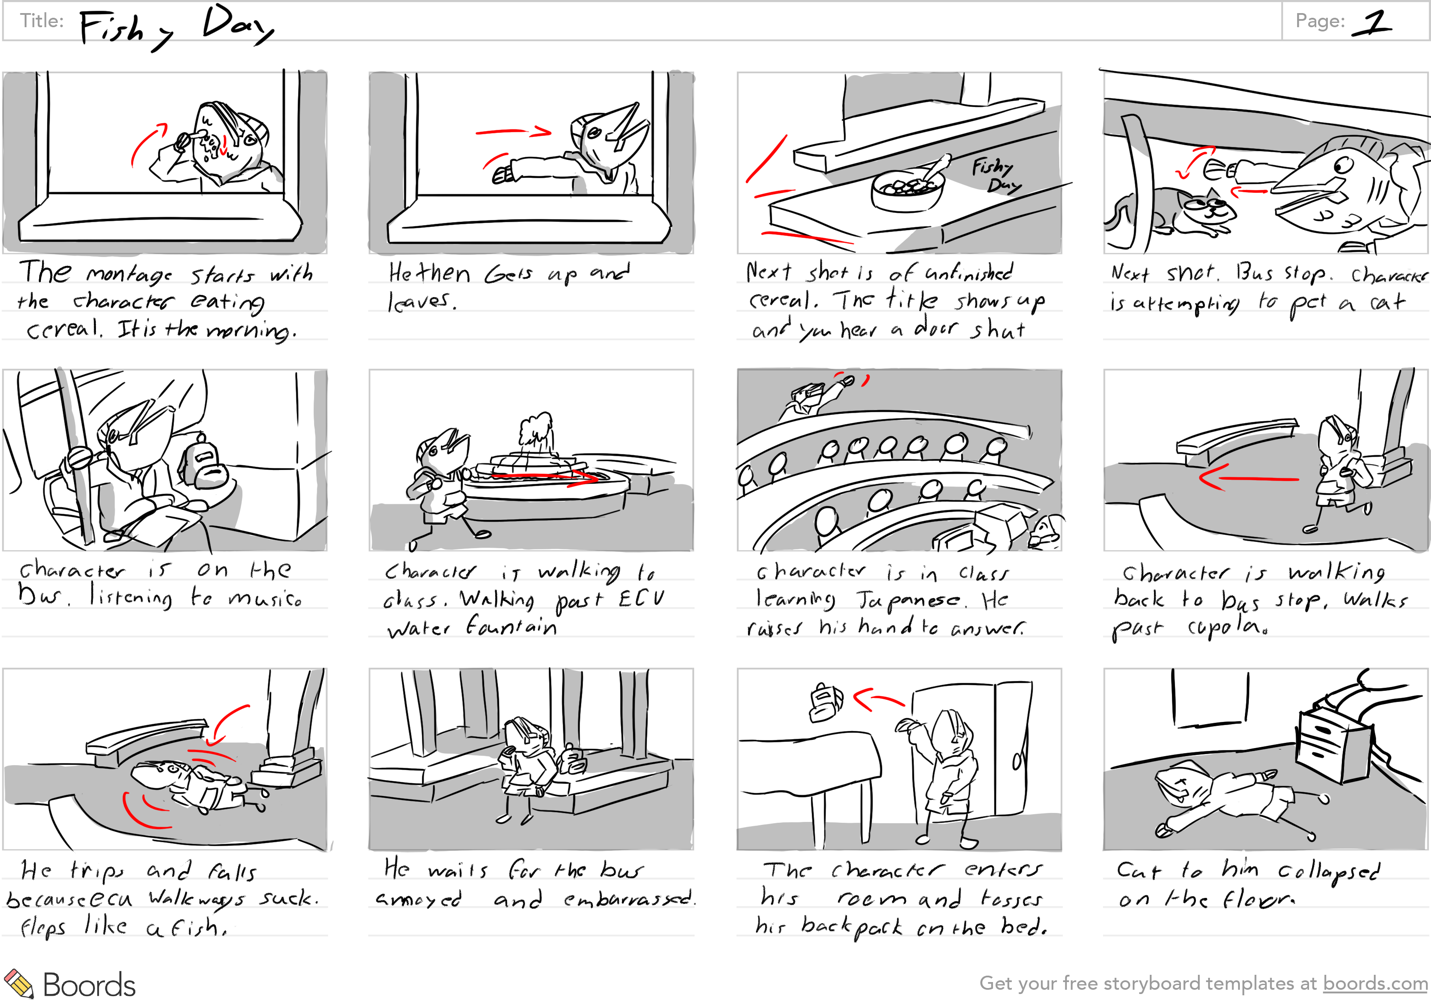
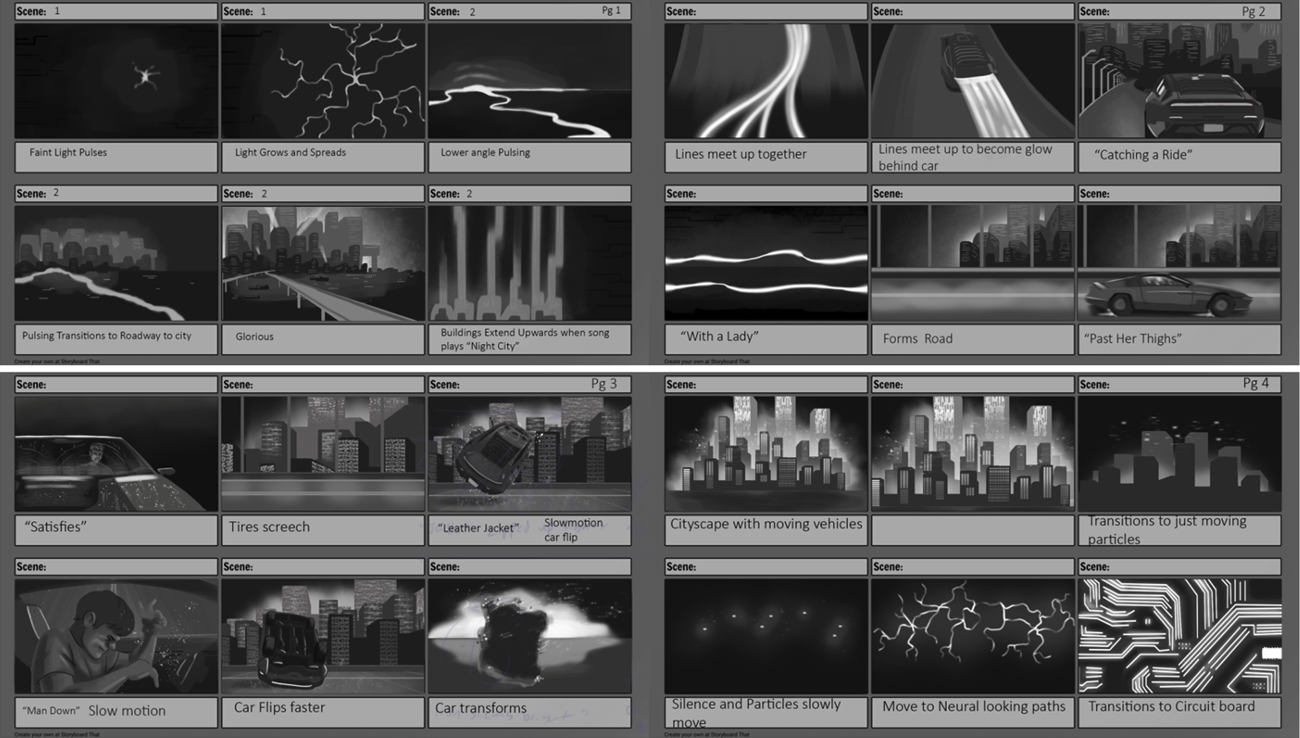
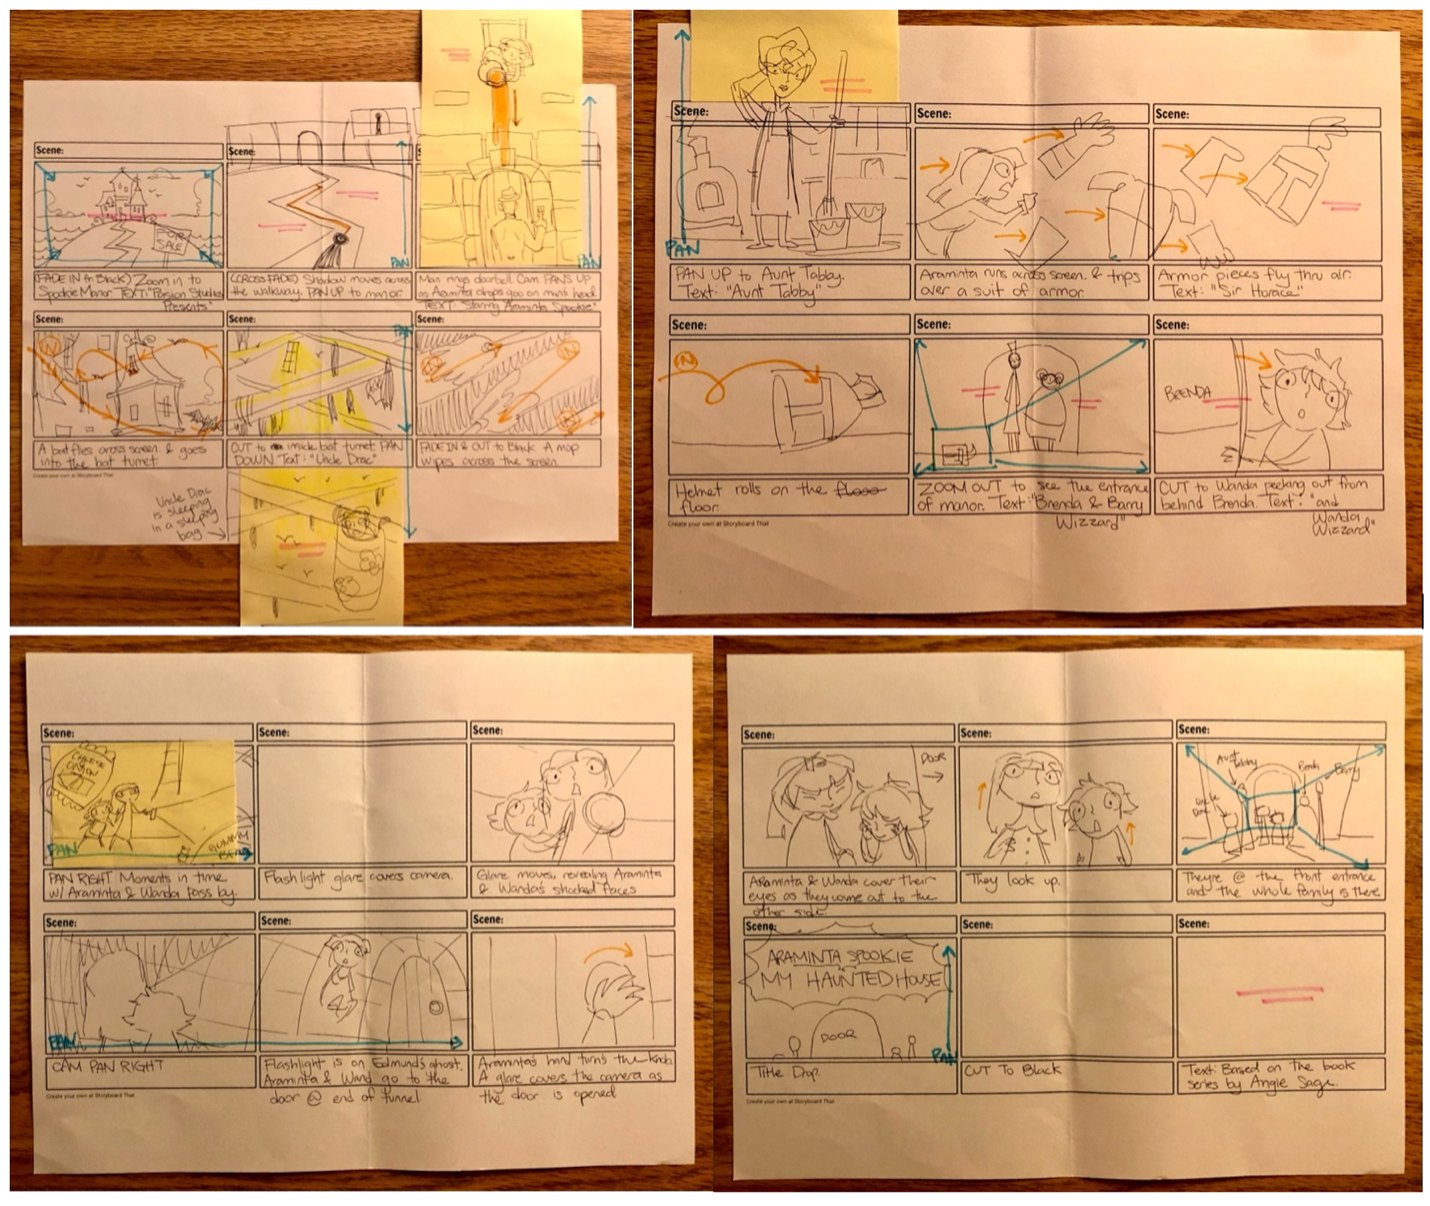
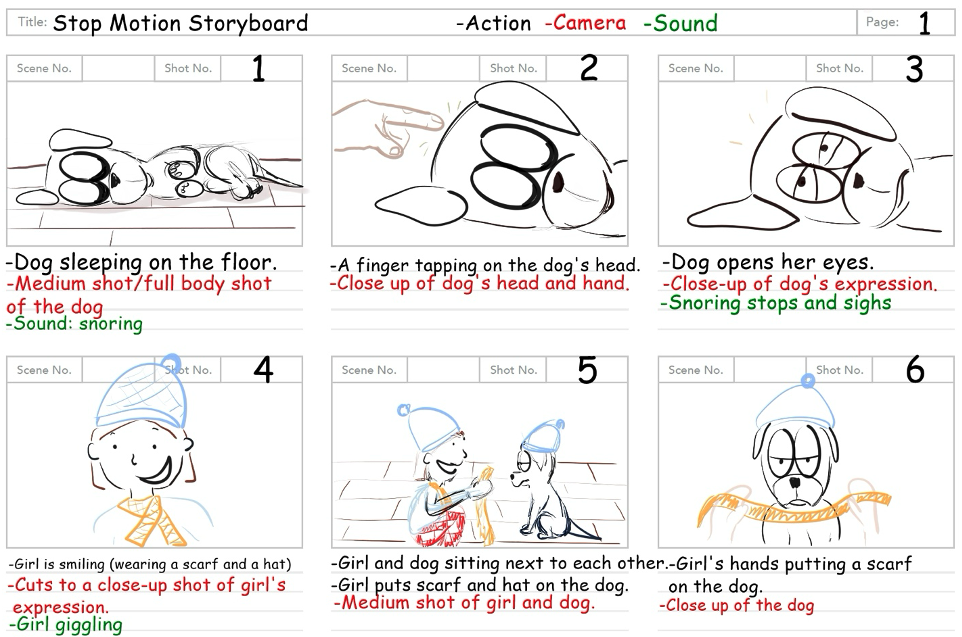
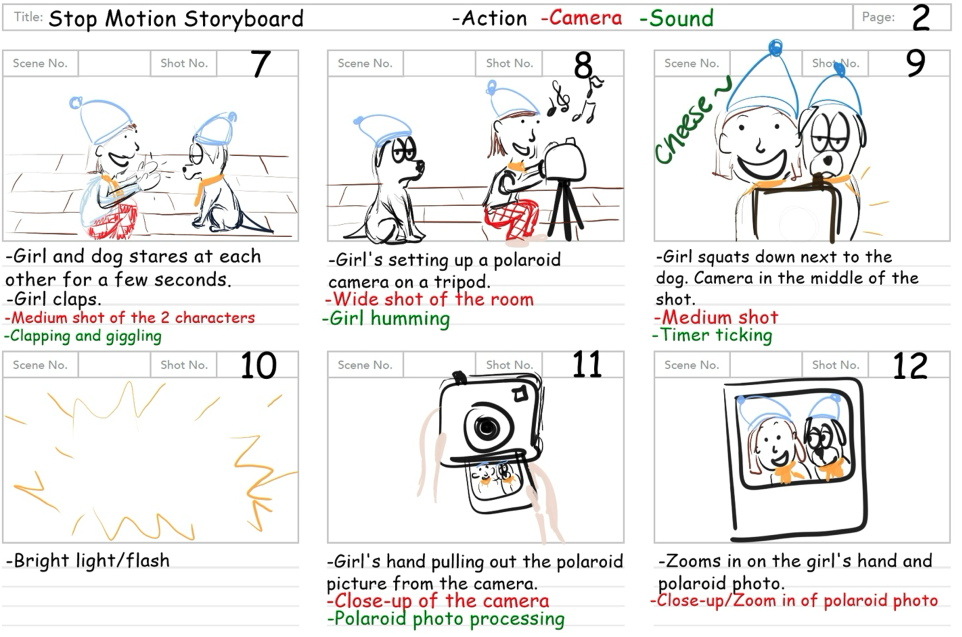
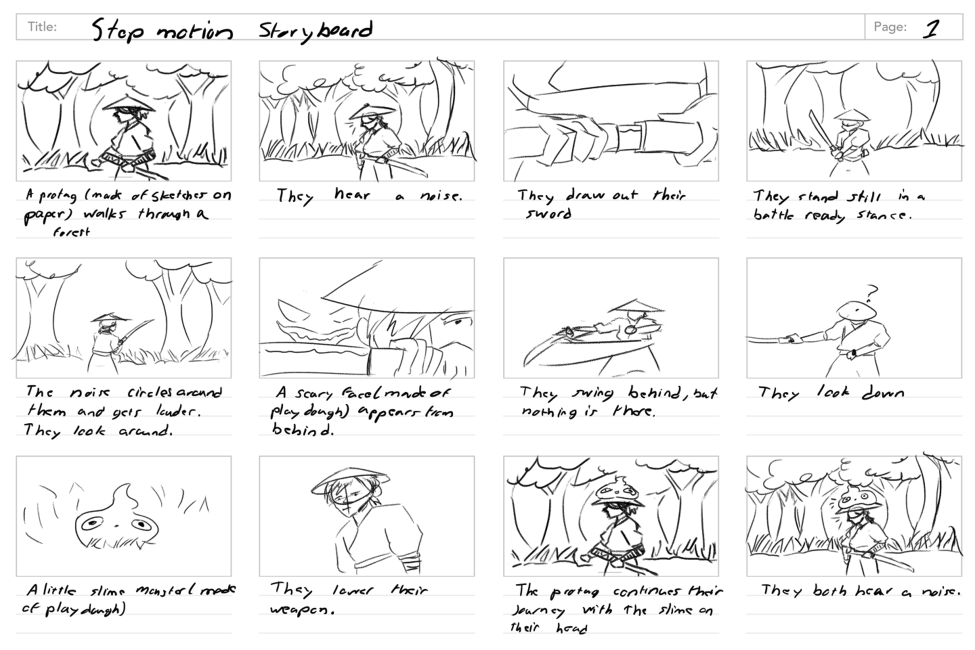
Assignment 1 | Storyboard
Storyboards are a vital part of the creative and production process. In addition to animation, they are used for everything from live-action films to motion graphics to keynote presentations.
Storyboards are used to visualize an action before many hours are spent producing and finalizing the animation. They are an outline of the action and are used to develop a strong visual story, spot weaknesses in plot or timing, or essential missing elements or shots.
Storyboards are much like comic books. You show the ‘key’ frames of animation while the action between frames is completed in the viewer’s mind. You can write in sound effects or use arrows to add emphasis to or illustrate actions. You should also write in narration below each frame to explain what kind of action is taking place.
Storyboards should start rough as pencil sketches or basic shapes because they will likely be changed. Once you have a more final structure, the storyboard is developed into a series of style frames.
Usually, when you are pitching a project idea to a client, you will show these more final style frame storyboards.
Think of the critical moments in your piece.
• What are the beginning, middle, and end of your piece?
• What are the other key ‘scene’ changes?
• How will the action progress?
• How will text, photos, illustrations, and other elements enter and exit the screen or transition from one frame to the next?
• How will shot composition, framing, and staging work together?
• Think about timing: how will your piece flow from beginning to end?
Start loose, preferably by sketching. But you can also use basic shapes and text in Photoshop and Illustrator. Don’t spend hours on each frame. The finalization will come later. Show ‘key’ frames, like a comic book. The action will be completed in the mind of the viewer.
Write descriptive narration under each frame to explain what kind of action is taking place. Use words like Zoom, Fade, Crossfade, Shrink, Grow, Pan left, Pan right, Pop, Flip, Spin, Float, Hold, etc.
Use arrows, if you like, to show the direction of the action.
Supplemental Information
- Animation Foundations: Storyboarding (LinkedIn Learning)
- Micah Buzan ANIMATION | How To Storyboard for Animation
- Bloop Animation | How to Storyboard
- Drawing with Jazza | How to make and edit storyboards in Photoshop (includes a .psd template that you can download if you want to create your storyboard in photoshop.
Final storyboards should be digital and in the correct aspect ratio.
Final boards should be a graphic representation of how your video will unfold, shot by shot, consisting of
several squares in the same aspect ratio as the intended video (generally, 16:9 aspect ratio, meaning the
width of the frame is about 1.78 times that of the height of the frame). They should have illustrations
representing each shot and notes about what’s going on in the scene.
Those of you, already in the Animation/Interactive design concentration should know the importance of the preproduction process. Preproduction work is an artwork in itself. Think about the joy of looking at
storyboards, character sheets, and environment art from the animations you admire.
Evidence of substantial preproduction work will be a vital component of your portfolio.

Student Examples
Villacis
Wilke
Lanier

Assignment 2 | Montage Video
Create a 60-second video piece with a sound collage. Tell a story without dialogue, using imagery and sounds.
You may use action shots, stills, drawings (scanned or digital in origin), and sampled or recorded audio to create your Montage. Consider your Montage to be a collage of collected images and sounds that tell a story. The Sound component is equally important as the video! All video clips and imagery must be your original creations.
Supplemental Material
The Basics of Premiere Pro Log in to Linkedin Learning with your ECU credentials
Premiere Pro Essential Training Log in to Linkedin Learning with your ECU credentials
Final Video:
Once you have assembled your 60-second Montage, place a few seconds of black video and a title screen at the beginning. At the end of your Montage, add a screen with your name and ART3080 Fall 2024, a credit screen if needed, and a few black video seconds.
How to add black
Premiere Pro CC: How to Add Black Video Background
To export, go to Export > Media, and under format, select H.264. Change the Output Name to YourName and export. Exporting H.264 from Premiere Pro
Student Work Examples | https://vimeo.com/user/15806543/folder/23683772
Villacis https://vimeo.com/manage/videos/1045131821
Wilke https://vimeo.com/manage/videos/1045138858

Lanier https://vimeo.com/manage/videos/1045141803

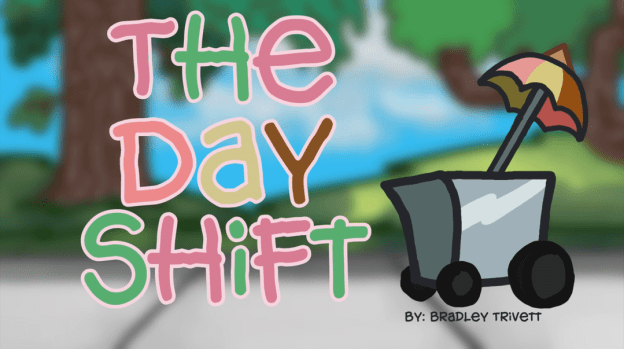
Trivett https://vimeo.com/manage/videos/1045139222
Linn https://vimeo.com/manage/videos/1045141803

Module 2 | Title Sequence
Overview
Module 2 | Title Sequence Assignment
A title sequence generally refers to how cinematic films or television shows present their title, key cast, and production members utilizing conceptual visuals and sound.
Title sequences can set the tone or the mood, introduce a character, foreshadow the movie’s theme, tell a back story, and establish a time or setting.
Since the late 1950’s films title sequences have often become a showcase for contemporary design and illustration, the title sequences of Saul Bass and Maurice Binder are among the best examples of this. However, they inspired many imitators both in cinema and on television. In the mid-90s, Kyle Cooper’s celebrated title sequence for David Fincher’s Se7en (1995) again influenced many designers.
Assignment:
Create a title sequence for a book that has not yet been made into a movie. Part of your project must be created using Adobe After Effects, a visual effects and motion graphics software. An obvious use for After Effects could be to animate titles; however, the program can also create amazing effects. It is up to you how much you want to explore the program; you may end up making your entire piece using only motion graphics.
If you are struggling to select a book, it does not have to be a book that you have read! You can read summaries for thousands of titles here: https://www.goodreads.com/genres/fiction
Considerations:
Keep in mind that you are only creating the title sequence; this is quite different from a movie preview or trailer. You can make up fictional production companies, actors, etc. Give yourself time to really explore Adobe After Effects, as you begin to explore, I am sure you will become excited as you see the possibilities that are available to you.
Your title sequence is not limited to a specific time limit, however, use just enough time to get your concept across, but keep it short enough to keep the viewer’s interest.
Required After Effects tutorial:
After Effects 2021 Essential Training 1h48m LinkedIn Learning (sign in with your ECU credentials
Supplemental AE Tutorials and Resources:
- After Effects: Principles of Motion Graphics 1h21m LinkedIn Learning (sign in with your ECU credentials
- After Effects: Character Animation 3h5m LinkedIn Learning (sign in with your ECU credentials
- Check out the School of Motion for some awesome and more specific tutorials and AE tips and tricks! Their YouTube channel has a ton of tutorials!
- Top techniques in After Effects
- Seven Cool Video Effects That Can be Created Using Premiere and After Effects
- Ten Ways to Make Kinetic Typography in After Effects
- Text Animators in After Effects
- 5 Easy Title Motion Graphics Techniques
Introduction to The Art of the Title Sequence
Saul Bass is probably the most significant pioneer in motion graphic design and his work marks the true beginning of what is now commonly referred to as motion graphics. Before Saul Bass, titles consisted entirely of glass plates and no graphic elements. His work included title sequences for popular films such as The Man With The Golden Arm (1955), Vertigo (1958), Anatomy of a Murder (1959), North by Northwest (1959), Psycho (1960), and Advise & Consent (1962). His designs were simple but effectively communicated the mood of the film.
When it came out in 1963, It’s a Mad Mad Mad Mad World had the first entirely animated title sequence for a live-action film. The title sets the tone of the film through color, tone, and character. A new movement heavily influenced the animation techniques used by Bass in Mad World in the cartoon industry that favored a modern, stylized aesthetic over the then-dominant school of Disney hyperrealism.
Title Sequence: https://www.youtube.com/watch?v=s1A7bJD3atk&ab_channel=FrankRizzo
Bass’ influence is felt today and continues to inspire. Nowhere is that more evident than in Spielberg’s Catch Me If You Can.
Catch Me If You Can (2002)
The sequence plunges viewers straight into its 60s setting by using a style that was frequently seen in title sequences at the time: Bass’ paper cut-out. That aesthetic, combined with other graphic elements of that era, such as airplane company poster designs and visual puns highlighting crew-members specific jobs, add layers of meaning. The extra magic touch is the jazzy, playful score by John Williams.
The title sets the mood of the film and immediately entertains the audience.
Title Sequence: https://www.youtube.com/watch?v=aN715Rp4L74&ab_channel=MovieTitles
To Kill a Mockingbird (1962)
Title sequence by Stephen Frankfurt. Film and title sequence that stands the test of time. The title sequence is composed of shots of the “treasure box” that belongs to the young narrator Scout, a child between six and eight. The camera is positioned to give the audience her point of view on what she is doing. Composed of macro shots, intimate compositions, and Scout’s humming provides the viewer with a sense that she is taking us into the story, where we are seeing an adult world and dire adult happenings through the eyes of a child.
Title Sequence: https://www.youtube.com/watch?v=v04pqVoH7rE&ab_channel=MovieTitles
An essential element in title sequences is the use of typography and its placement. Typography and titling can convey a lot about the story, brand, and feeling.
Se7en (1995)
The typography in Se7en‘s title sequence, designed by Kyle Cooper, is particularly striking because different styles were designed for the crew’s titles, for the names, and John Doe’s notebooks. All three forms convey that the film is about a disturbed individual and that the story will be disturbing.
Everything is off, the hand printing for the names isn’t straight, the typesetting on the titles is offset in a way it shouldn’t be, and there is obsessive scrawl covering the notebooks. Of course, even without the typography, the sequence would still be disturbing, but it adds a great deal to the overall effect of making the audience uncomfortable.
The title sequence for Se7en is a small, self-contained movie on its own that opens the door into the mind of a serial killer and sets the tone for the whole feature. The sequence sets up the killer, who doesn’t get introduced until the latter part of the film.
The title sequence for Se7en is considered a landmark of visual culture, its influence ranging from graphic and motion design, film, music videos, advertising, and media art. It is considered iconic because the typography, the editing, the music, and the cinematography all create such a visceral reaction.
Se7en Title Sequence: https://vimeo.com/153854394
Interview with Kyle Cooper
http://www.watchthetitles.com/articles/00170-Kyle_Cooper_interview_pt_1_2
http://www.watchthetitles.com/articles/00184-Kyle_Cooper_interview_pt_2_2
Gattaca (1997)
Significant text effects, notice the highlighting of G, T, A, and C, which are the four parts of the genetic code (also the title). What at first appears to be a lovely snowfall, reveals close-up shots of skin shedding and nail clippings. Color and sound play a beautiful role in the sequence.
Title Sequence: https://prologue.com/portfolio-item/gattaca/
Delicatessen (1991)
Excellent use of practical effects. The camera pans over different garbage bits, using the typography of the items to list the credits.
Title Sequence: https://www.youtube.com/watch?v=mSo5emPa5Zs&ab_channel=MovieTitles
Thank You for Smoking (2005)
A brilliant sequence, somewhat similar to delicatessens with its use of the individual cigarette packaging to list the credits.
Title Sequence: https://www.watchthetitles.com/titlesequence/thank-you-for-smoking/
Vantage Point (2008)
An elegant sequence that conveys the idea of perspectives. It reflects the many vantage points of the movie. The short V-shaped images are meant to give the viewer a quick snapshot or insight into the film. Also, notice the use of the red laser dot as a motif, which immediately introduces the theme of assassination and threat.
Title Sequence: https://themorrisonstudio.com/film-titles/vantage-point
Fight Club (1999)
Here, the viewer follows a path outward from the “fear center” of the protagonist’s brain, moving through various cerebral micro-landscapes and exiting a skin pore, gracefully ending between the sights of a gun pointed into his mouth.
Title Sequence: https://vimeo.com/90519890
True Blood (2008)
The sequence is primarily composed of the show’s deep south setting. It intermingles contradictory images of sex, violence, and religion. The imagery is displayed through the eye of an observer. The sequence explores ideas of redemption and forgiveness, suggested by the progress from morning to night and ending with the image of baptism. The sequence also features images that represent themes of death and rebirth, the circle of life. The production studio, Digital Kitchen, wanted to express how religious fanaticism and sexual energy could corrupt humans and make them animalistic.
Title Sequence: https://www.watchthetitles.com/titlesequence/true-blood/
Lemony Snicket’s A Series of Unfortunate Events (2004)
Based on the popular children’s book series A Series Of Unfortunate Events, the movie “Lemony Snicket’s” tells the story of the three Baudelaire orphans who are sent to live with a distant relative Count Olaf. But the evil and greedy Olaf is after the children’s fortune and is secretly concocting a scheme to kill them.
Title Sequence: https://www.watchthetitles.com/titlesequence/lemony-snickets-a-series-of-unfortunate-events/
Under the Gun (2016)
Opening titles for Stephanie Soechtig & Katie Couric’s documentary on gun violence and the history of the NRA. (A great example of using historical stock footage)
Title Sequence: https://vimeo.com/214156313
More Saul Bass influence :)
Monsters, Inc (2001)
Reminiscent of classic 2D animated openings for live-action comedies of the 1950s and 1960s like Saul Bass’s work for Around The World in Eighty Days (1956) and It’s A Mad Mad Mad Mad World (1963).
Title Sequence: https://vimeo.com/92668290
The following websites contain libraries of titles:
https://www.watchthetitles.com/
https://www.artofthetitle.com/
Notes About Titles and Fonts
An essential element in title sequences is the use of typography and its placement. Typography and titling can convey a lot about the story and should be carefully considered design elements.
Considerations:
*When you add your actor credits, PLEASE, for the love of all that is good, do not use the names of existing actors! I understand the desire to do that but trust me; it distracts from your title sequence. There are a lot of free name generators available online that you can use.
*For this project, you may use any music (does not have to be royalty-free) but be sure to credit it.
*Text plays a crucial role in this project. You will want to consider where you place your titles on the screen carefully. Be sure to keep them within the title safe zone. Article about safe zones:
*Keep in mind that the titles are a critical design element. Carefully select your fonts! Do not leave them as an afterthought. Select fonts that convey the tone of the film.
Don’t use too many different fonts, two to three at the most. You might consider using fonts within the same family, but different weights. If you do use multiple fonts instead of multiple weights of the same font, make sure they complement one another. Guide to font pairing:
https://www.canva.com/learn/the-ultimate-guide-to-font-pairing/
Common Credits Listed in Title Sequences
Below is a list of possible credits.This is only a suggestion of possible titles. Not all of these have to be listed in the title sequence, but, commonly, they are. The order is not absolute either. The credits you choose to list will be influenced by the source of the movie you are creating the title sequence for, and the role of the sequence to the piece.
- A _____ _____ Cinema Presents
- A _____ _______ Production
- -and -or-
- In association with __________ Film(S)
- A Film by _____ _______
- -and -or-
- A _________ _________ Film
- Actor
- Actor
- Title
- Secondary Actor
- Secondary Actor
- Secondary Actor
- Secondary Actor Secondary Actor
- Secondary Actor Secondary Actor Secondary Actor
- Casting By _______, _________ and _________
- Music By _________
- Costumes Designed By ______________
- Edited By _______________
- Production Designed By ______________
- Director of Photography ______________
- Co-Producers ___________ ____________
- Co-Executive Producers ________ ____________
- Executive Producers _________ ___________
- Written By ___________
- -or-
- Based on the (Novel, script, short story, etc.) By _______________
- -or-
- Written for the Screen and Directed by ________
- Produced By ______________
- Directed By _______________
- (Title)
Assignment 1 | Storyboard
Submit a functioning storyboard in a standard layout (16:9 aspect ratio) that is informative and clear.
It is up to you how you go about it; you can create it digitally, download, print out a template to draw on, scan it or photograph it, draw the storyboard in your sketchbook, and then scan/photograph it.
If you do photograph it, take the time to shoot it in decent light, make sure the perspective is not skewed and crop out the background.
Keep in mind that preproduction work is an artwork itself and that storyboards are worth 20% of your grade.
Student Work Examples
Osipenko

Lackey
Whoolery

Pasion
Assignment 2 | Style Frames
Create three complete style frames that show how your final Title Sequence will look.
Illustrate the most significant moments from your storyboard and refine them so that they are in the correct aspect ratio and present what the finished animation will look like.
You may use any software program you like but be sure that your image size is 1,920 x 1,080.
Ideally you would design your style frames so that the images that will be animated are on separate layers. That way, you can import the project file (PSD or AI files) and Import as Comp (Retain Layer Sizes) into After Effects.
From there you will be able to animate the layers separately.
Student Work Examples
Osipenko


Lackey


Whoolery


Assignment 3 | Title Sequence Video
Create a title sequence for a book that has not yet been made into a movie. Part of your project must be created using Adobe After Effects, a visual effects and motion graphics software. An obvious use for After Effects could be to animate titles; however, the program can also create amazing effects. It is up to you how much you want to explore the program; you may end up making your entire piece using only motion graphics.
Student Work Examples https://vimeo.com/user/15806543/folder/23683756
Osipenko https://vimeo.com/manage/videos/1045142829
Lackey https://vimeo.com/1045144271

Whoolery https://vimeo.com/1045142337

Pasion https://vimeo.com/679616768

Harrison https://vimeo.com/679616767

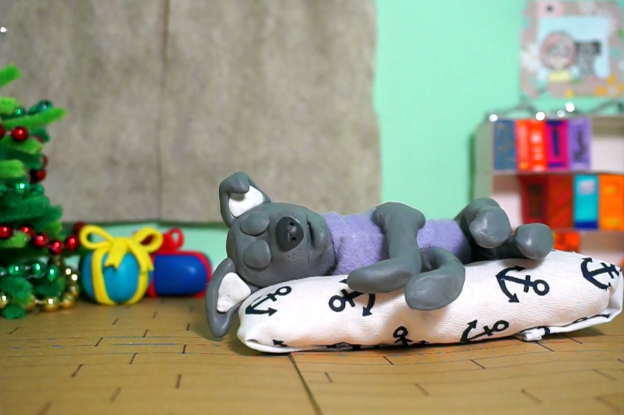
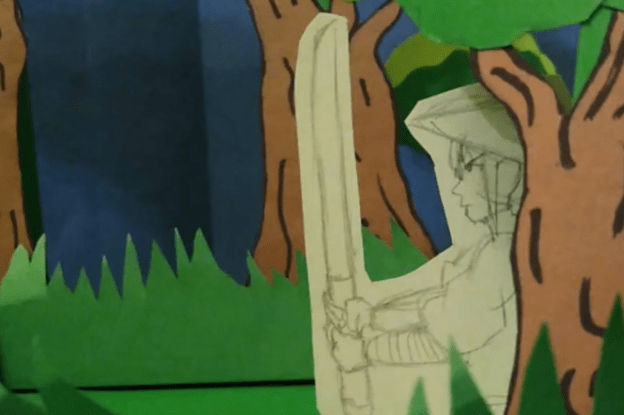
Module 3 | Stop Motion Animation
Objective:
Create a stop motion animation that is at least 30 seconds long. You will be importing your shots at 24 frames per second, which means you will need to shoot 12 images for every second of the video. For 30 seconds of video, you will need 360 shots.
Stop motion is an animation technique used to make a physically manipulated object appear to move on its own. The object is moved in small amounts between individually photographed frames, creating the illusion of movement when the frames are played as a continuous sequence.
Materials:
Digital Camera
Tripod
Necessary materials for building your set, characters, etc.
Collected or recorded sound
Below are several Stop Motion Animation resources:
- Information about Several Stop Motion Animation Processes: https://justmakeanimation.com/10-types-of-stop-motion-animation/
- Online Resources for Stop Motion Animation https://stopmotionanimation.com/
- Animating at Home (an example of a stop motion animation setup) https://vimeo.com/398802797?fbclid=IwAR2hHWeK1pP1dM4KBcGY8SQ84qnNoso35DSbxxzCcJY4ot5dZT-ES_pgZok
- Guide for Making a Home Setup (another example of a stop motion animation setup) http://www.animationexploration.org/2020/03/15/diy-downshooter/
- Guide to Stop Motion Apps for Smartphones https://justmakeanimation.com/make-stop-motion-movies-on-your-phone/
- Steps for Importing Images into Premiere Pro for Stop Motion https://mediacommons.psu.edu/2020/03/19/creating-stop-motion-animation-in-premiere-pro/
- How to Create a Stop Motion Animation in Adobe Premiere Pro Video Tutorial https://www.youtube.com/watch?v=bY98b8onq9M
- How to Create a Stop Motion Animation in Adobe Premiere Pro https://blog.pond5.com/17665-painting-stop-motion-animation/
- How to Make Stop Motion Animation Guide for Beginners https://www.youtube.com/watch?time_continue=1&v=wyToeVMhilo&feature=emb_title
- Fundamental Tips for Ensuring Successful Results
https://create.adobe.com/2018/9/7/start_your_first_sto.html - Video Showing Different Ways of Animating with Paper https://vimeo.com/476346810
- Instructions on Making a Paper Puppet for Stop Motion Animation https://www.skillshare.com/classes/Animation-Make-a-Paper-Puppet-for-Stop-Motion/1712364318
- Youtube Channel with several great tutorials, especially claymation, and animating with toys: https://www.youtube.com/playlist?list=PL44F7344428AB62FC
- LinkedIn Learning Course (Log in using your ECU email address and PW): Learning Stop Motion Animation Richard Harrington 1h 53m
Assignment 1 | Story Board
Submit a functioning storyboard in a standard layout (16:9 aspect ratio) that is informative and clear.
It is up to you how you go about it; you can create it digitally, download, print out a template to draw on, scan it or photograph it, draw the storyboard in your sketchbook, and then scan/photograph it.
If you do photograph it, take the time to shoot it in decent light, make sure the perspective is not skewed and crop out the background.
Keep in mind that preproduction work is an artwork itself and that storyboards are worth 20% of your grade.
Student Work Examples
Ko
Whitford

Villacis
Assignment 2 | Stop Motion Animation Video
Objective:
Create a stop motion animation that is at least 30 seconds long. You will be importing your shots at 24 frames per second, which means you will need to shoot 12 images for every second of the video. For 30 seconds of video, you will need 360 shots.
Stop motion is an animation technique used to make a physically manipulated object appear to move on its own. The object is moved in small amounts between individually photographed frames, creating the illusion of movement when the frames are played as a continuous sequence.
Materials:
Digital Camera
Tripod
Necessary materials for building your set, characters, etc.
Collected or recorded sound

Student Work Examples https://vimeo.com/user/15806543/folder/23683740
Ko https://vimeo.com/1045151130
Whitford https://vimeo.com/1045155419

Villacis https://vimeo.com/1045154748
Module 4 | Demo Reel
A demo reel is a collection of short clips that showcases your work. You will create many reels throughout your career, but this first one is to get you started, giving you something you can share in internship applications. I hope you will also continue crafting your reel so that by the senior year, you already have a pretty good demo reel.
Demo reels are usually up to two minutes long, but for this first one, I would like you to keep it at 30 seconds so that you can focus on quality.
A well-made demo reel can make all the difference between getting the job of your dreams and not. A polished reel will undoubtedly boost your chances, even if your portfolio is still limited. Therefore, make sure you are putting your best foot forward from the first frame to the last.
When you create your demo reel, you want to ensure that your best work is shown first (sometimes, potential employers only watch the first 20-30 seconds). However, you will also want to end with your best work too.
Decide on the music for your reel from the beginning and cut your reel to its rhythm. Select a royalty-free music track; here are some resources: Pixabay.com and Uppbeat.io
From there, start going through your work and select the best clips. Extract those clips and start laying them out in the timeline using video editing software (Adobe Premiere Pro). You will want to split clips up into bits that are around 3 seconds or less and intermingle them with each other.
Begin and end your reel with your name and contact information.
It is not a requirement, but I urge you to assemble your demo reel in Adobe Premier Pro, it is an excellent tool for assembling/editing. It is also a very user-friendly program and quick to learn.
This web page contains a great 12min beginner video that covers how to assemble a demo reel in Premiere: Assemble your demo reel
Read the article How to Make a Demo Reel:
https://www.mediacollege.com/employment/demo-reel.html
Inspiration:
One of the best things you can do to prepare for creating a demo reel is to watch successful examples. Pay specific attention to their transitions. Consider how they weave examples of process work into the reel. Find inspiration in how they use their chosen music to set the pace of their reel and enhance their work.
During class we will view several examples of demo reels and reels from former students. The following links offer further inspiration:
Showcase of Professional Demo Reels
Assignment | Demo Reel Video
From the work you have created during this course as well as any other A/ID courses you have taken, create a demo reel that is 30 seconds in length. Include your name and contact information at the beginning and again at the end.
Begin by going through all your animation work and select the best clips. Extract those clips and, using video editing software (Adobe Premiere Pro), start laying them out in the timeline. You will want to split clips up into bits that are 3 seconds or less and intermingle them with each other.
The opening shot is the most critical part of your demo reel. You want to catch the viewer’s attention and maintain their interest. Your demo reel should be fast-paced and dynamic. Craft your reel using thoughtful transitions from one clip to the next, weaving together a story about your work that engages the viewer. End with an impressive shot that will seal the impression you want to make.
Choose music that fits the pace of your demo reel and adjust your clips to match the two seamlessly. Select music that does not contain words. If your clips include important audio, fade the music in and out to allow for the sound to be heard.
A couple of resources for free royalty free music: Pixabay.com and Uppbeat.io
Begin and end the reel with your name and contact information.
Export your demo reel as H.264 and name the file Your_Name.mp4
Student Work Examples https://vimeo.com/user/15806543/folder/23683719
Grice https://vimeo.com/1045159314

Wilke https://vimeo.com/1045156117
Thomas https://vimeo.com/1045158593
Osipenko https://vimeo.com/1045158928

Appendix
- Reading List and Reference
- Syllabus
Reading List and Reference
Animation Foundations: Storyboarding (LinkedIn Learning) https://www.linkedin.com/learning/animation-foundations-storyboarding/welcome?u=76264346
Micah Buzan ANIMATION | How to Storyboard for Animation https://www.youtube.com/watch?v=m2JJxRlxV2s&ab_channel=MicahBuzanANIMATION
Bloop Animation | How to Storyboard https://www.bloopanimation.com/how-to-storyboard/
Drawing with Jazza | How to make and edit storyboards in Photoshop (includes a .psd template that you can download if you want to create your storyboard in photoshop. https://www.youtube.com/watch?v=7cWVdK5xyTs&ab_channel=Jazza
The Basics of Premiere Pro (LinkedIn Learning) https://www.linkedin.com/learning/learning-premiere-pro/the-basics-of-premiere-pro?u=76264346
Premiere Pro Essential Training (LinkedIn Learning) https://www.linkedin.com/learning/premiere-pro-2020-essential-training/welcome?u=76264346
Premiere Pro CC: How to Add Black Video Background https://www.youtube.com/watch?v=zJzMQ9AHkmw
After Effects Essential Training (LinkedIn Learning) https://www.linkedin.com/learning/after-effects-2021-essential-training-the-basics/animate-with-the-timeline?u=76264346
After Effects Character Animation (LinkedIn Learning) https://www.linkedin.com/learning/after-effects-cc-2019-character-animation-essential-training/welcome?u=76264346
School of Motion https://www.schoolofmotion.com/blog
Top techniques in After Effects by SonduckFilm https://www.youtube.com/playlist?list=PLCE5MltCMHTrxAhU3v7i10ju_YPJ9XjIK
7 Cool Video Effects That Can be Created Using Premiere and After Effects https://www.creativebloq.com/features/cool-video-effects?utm_source=Selligent&utm_medium=email&utm_campaign=23057&utm_content=140920_GC+&utm_term=3812551&m_i=dStdGryGMX36mLjglvNOIqrnIf9SDpTcb7mxF2LVOdnQflVr9FVTOXs4G_mbvZvSYZHq6bSYnnv%2BbA2_jLZd_QnLeC1fD%2
Ten Ways to Make Kinetic Typography in After Effects https://www.webdew.com/blog/kinetic-typography-after-effects
Text Animators in After Effects https://www.youtube.com/watch?v=b1_p2qQf_Ts&list=WL&index=33&t=1602s
Five Easy Title Motion Graphics Techniques | After Effects Tutorial https://www.youtube.com/watch?v=l1swuCIovtI
10 Types of Stop Motion Animation https://justmakeanimation.com/10-types-of-stop-motion-animation/
Stop Motion Animation.com https://stopmotionanimation.com/
Animating at Home (an example of a stop motion animation setup)
https://vimeo.com/398802797?fbclid=IwAR2hHWeK1pP1dM4KBcGY8SQ84qnNoso35DSbxxzCcJY4ot5dZT-ES_pgZok
Animation Exploration: DIY Downshooter Set-Up https://www.animationexploration.org/2020/03/15/diy-downshooter/
Just Make Animation: Guide to Stop Motion Apps for Smartphones https://justmakeanimation.com/make-stop-motion-movies-on-your-phone/
Steps for Importing Images into Premiere Pro for Stop Motion https://mediacommons.psu.edu/2020/03/19/creating-stop-motion-animation-in-premiere-pro/
How to Create a Stop Motion Animation in Adobe Premiere Pro Video Tutorial https://www.youtube.com/watch?v=bY98b8onq9M
How to Create a Stop Motion Animation in Adobe Premiere Pro
https://blog.pond5.com/17665-painting-stop-motion-animation/
How to Make Stop Motion Animation Guide for Beginners
https://www.youtube.com/watch?time_continue=1&v=wyToeVMhilo&feature=emb_title
Your First Stop Motion Animation | Fundamental Tips for Ensuring Successful Results
https://create.adobe.com/2018/9/7/start_your_first_sto.html
Different Ways of Animating with Paper https://vimeo.com/476346810
Stop Motion Tutorials: YouTube Channel with several great tutorials, especially Claymation, and animating with toys: https://www.youtube.com/playlist?list=PL44F7344428AB62FC
Learning Stop Motion Animation (LinkedIn Learning) https://www.linkedin.com/learning/learning-stop-motion-animation/choosing-editing-software?u=76264346
Assembling a Demo Reel in Adobe Premiere Pro https://www.adobe.com/learn/premiere-pro/web/assemble-demo-reel?locale=en&learnIn=1
Media Collage: How to Make a Demo Reel https://www.mediacollege.com/employment/demo-reel.html
Vimeo Demo Reel Channel https://vimeo.com/channels/demoreels
Vimeo Showcase of Professional Demo Reels https://vimeo.com/showcase/5566533
Syllabus
Course Syllabus
ART3080 Narrative Through Kinetic Imaging
Time-based media and methods for developing storytelling skills.
Course description
This course explores narrative development utilizing various methods of time-based media. Film, animation, title sequence screenings, project assignments, and class discussions will be included. Students will be introduced to editing and compositing, animating and creating motion graphics, and Stop-Motion Animation. Finally, they will create a Demo Reel.
Upon completing this course, students will leave with practical tools, ideas, and opinions about storytelling through various time-based media, giving them a foundation for ongoing animation art exploration and expansion beyond the classroom.
Course topic outline:
- Narrative Focus:
- Emphasis on narrative development using various methods and time-based media.
- Integration of physical materials in the creative process alongside digital work.
- Course Outcome:
- Acquisition of practical tools, ideas, and opinions for storytelling through time-based media.
- Foundation for ongoing animation art exploration and expansion beyond the classroom.
Student Learning Outcomes
- Demonstrate skills in the use of industry-standard technologies relevant to animation and video in response to set projects.
- Employ basic principles, concepts, tools, techniques, procedures, and technologies sufficient to produce animation art from concept to a finished product that communicates ideas and stories to viewers or audiences.
- Recognize the principles of animation, including its visual, spatial, sound, motion, and temporal elements and features, and how these elements are combined in the development of animation art.
Course Objectives
The primary focus of this course is storytelling. Students will develop their storytelling skills using various methods (sound, imagery, animation, etc.) and media (two-dimensional, three-dimensional, and digital). Though the final results will be digital, students will frequently work with physical materials throughout the creative process.
Required Materials
- Digital video camera, DSLR, smartphone, etc. DSLR and point and point-and-shoot digital cameras are available for checkout through Joyner Library
- Students will create stop-motion animation and need materials for building sets, characters, etc.
- A Tripod is necessary for shooting video and, more importantly, still images. If you are using a smartphone, you will need a tripod designed to hold it. Several inexpensive options are available. Consider purchasing one that comes with a Bluetooth remote control (this will be especially helpful when creating the stop-motion animation). Traditional camera tripods and phone tripods are available for checkout through Joyner Library.
- A pair of headphones.
Software
Students will be instructed on using Adobe CC software for a portion of this course. If you have not already signed up for your free Adobe CC account, you may do so here:
Materials Recommended (but not required)
- Wacom Pro Pen
Currently, there are two options: Wacom Pro Pen 2 and Waco Pro Pen Slim
- A portable Hard Drive, 1TB SSD
Course Conduct
This semester, the course will be hybrid. We will meet on campus once a week: ART3080-001 will meet on Mondays at 8 AM, and ART3080-002 will meet on Wednesdays at 8 AM. Your attendance in person is expected. Classroom time includes lectures, instructor demonstrations, class exercises, design and production assignments, project work, and critique. The remainder of the course will be conducted online and designed in an asynchronous format to accommodate diverse schedules.
Most course content will be available on Canvas. Additional communication and collaboration platforms such as Microsoft Teams, Discord, and Cisco Webex will also be accessed. To download the Cisco Webex App: https://ecu.teamdynamix.com/TDClient/1409/Portal/KB/ArticleDet?ID=67446
Students must engage in online discussion forums and all activities by the posted deadlines. When posting on discussion boards and chat rooms, it is essential to understand how to interact online and use proper netiquette. You can read more about the rules of netiquette here: http://www.albion.com/netiquette/corerules.html.
I seek to create an online environment where individuals can openly share their thoughts, viewpoints, and ideas. Class members are expected to respect the diverse backgrounds of other class members. Students are expected to contribute actively to critiques and discussions. Individual participation and conduct will be a significant portion of each student’s final grade.
Class Expectations
Participation is mandatory. Students are expected to contribute actively during critiques and class discussions. Individual participation and conduct will be a significant portion of each student’s final grade.
All course projects are mandatory and must be completed and submitted to Canvas on the due date. Late projects may not be included in the critique and will be docked 10%. Late work will not be accepted past one week (seven days) from the due date.
Attendance Policy For information on university excused absences, see http://www.ecu.edu/cs-studentaffairs/dos/excused_absences.cfm. Attendance is mandatory, and missing more than ONE Class will result in a Grade Reduction. Missing THREE Classes will result in a grade of “F” for the course regardless of the project grade.
- Students must be in class on time. Arriving late to class three times will count as an unexcused absence. Missing more than 15 minutes of class time, including leaving class early without permission, will also be considered an unexcused absence.
- Students must come to class prepared! They should have the required materials and due assignments. Arriving unprepared may result in an unexcused absence.
- Missing class during a critique will result in an unexcused absence and an F for the due assignment.
Computer Lab Rules
Students must abide by the following rules. Failure to do so may result in the student being asked to leave the classroom for the remainder of the class period with the result of an unexcused absence.
- Food and drink are NOT allowed in studios and computer labs. This policy applies to the entire school. Students can eat snacks and food in the student lounge (room 208). This policy includes after-hours!
- During class, cell phones must be silenced and put away.
- During class, the lab computers are to be used for coursework for this course only.
- All lab equipment must be treated appropriately, and students must clean up after themselves.
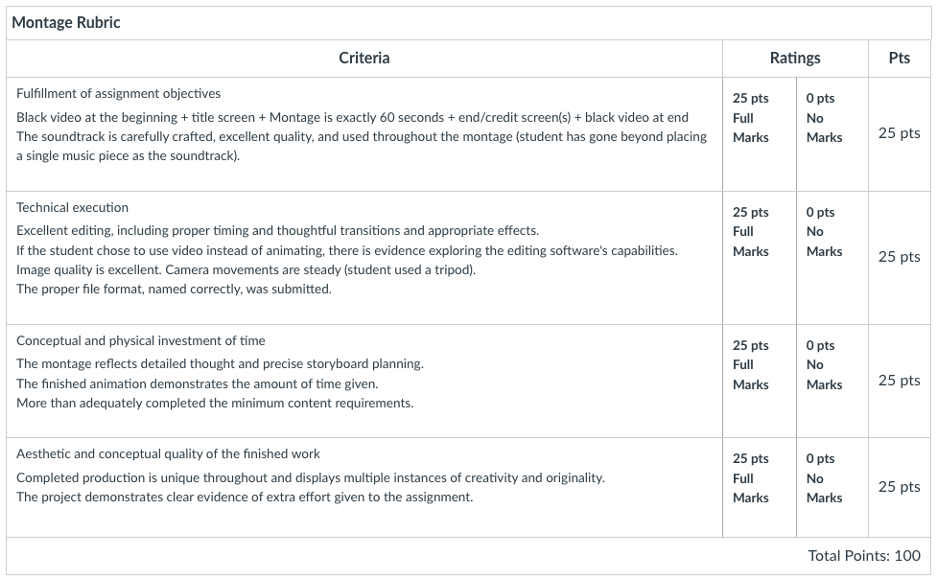
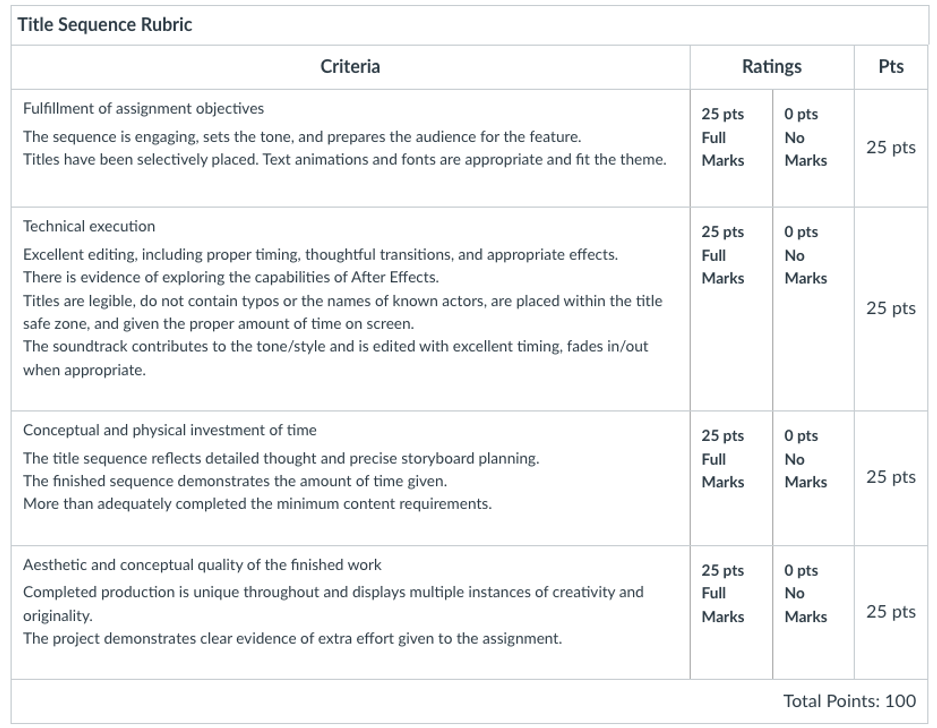
Project Evaluation
Projects are evaluated on the following criteria:
25% Fulfillment of assignment objectives
25% Technical execution
25% Conceptual and physical investment of time
25% Aesthetic and conceptual quality of the finished work
Letter Grading
Letter grades will be assigned based on the number of points earned from assignments. See the conversion table below.
|
Grading Scale |
|||
|
Grade |
Grade Scale |
GPA |
|
|
A |
93-100 |
4.0 |
Achievement substantially exceeds basic course expectations |
|
A- |
90-92.99 |
3.7 |
|
|
B+ |
87-89 |
3.3 |
|
|
B |
83-86.99 |
3.0 |
Achievement exceeds basic course expectations |
|
B- |
80-82.99 |
2.7 |
|
|
C+ |
77-29.99 |
2.3 |
|
|
C |
73-76.99 |
2.0 |
Achievement adequately meets basic course expectations |
|
C- |
70-72.99 |
1.7 |
|
|
D+ |
67.69.99 |
1.3 |
|
|
D |
63-66.99 |
1.0 |
Achievement falls below basic course expectations |
|
D- |
60-62.99 |
.7 |
|
|
F |
0-59.99 |
0 |
Failure – achievement does not justify credit for the course |
|
I* |
Incomplete |
* |
(granted for deficiency in quantity, not quality, of work) |
The course consists of four modules. The first three each require a project proposal, a storyboard, the final video, and critique participation. Students will create a Demo Reel in the fourth module and update their portfolio site. The fourth module counts as the course final
- Storyboards = 20% of the final grade
- Projects = 50% of final grade
- Critique and Course Participation = 10% of final grade
- Final = 20% of final grade
Office Hours and Contact Information
Office hours: J1309, MW 7-8 am and TTH 12:30-2 pm or virtually by appointment: https://ecu.webex.com/meet/mcintyrea.
The best method to contact me is by email at mcintyrea@ecu.edu, which I check regularly. Please enter “Art 3080” in the subject line of your message. Describe the nature of the problem you are having as entirely as possible. During regular working days, M-F and working hours (8 am-5 pm), I will do my best to respond within that day. During other times, there may be a 24-hour delay. Please include your availability if you would like to schedule a meeting with me outside of my regular office hours.
Academic Integrity Policy
http://www.ecu.edu/cs-acad/fsonline/customcf/currentfacultymanual/part6section2.pdf
The policy is also available to students at this link: http://www.ecu.edu/osrr/students-academic_conduct_process.cfm
Also, see information on the webpage for student rights and responsibilities: http://www.ecu.edu/osrr/
As members of the ECU community, students are expected to uphold this value daily. Academic integrity is essential to your education and learning, as well as the integrity of your degree and the entire university community. As a member of this academic community, you are expected to review the entire Academic Integrity Policy and consult a faculty member if you are unsure if a behavior violates the Academic Integrity policy. If you observe an academic integrity violation, immediately report it to the faculty member.
Academic integrity is a fundamental value of higher education and East Carolina University; therefore, cheating, plagiarism, falsification, or attempts to cheat, plagiarize, or falsify will not be tolerated. Should I determine that an academic integrity violation has occurred, I reserve the right to assign a grade penalty or refer the case to the Office of Student Rights and Responsibilities for an Academic Integrity Board hearing. The minimum grade penalty that I will assign is an F for the assignment/course. Should it come to my attention that you have had a prior academic integrity violation or other aggravating circumstances, I will refer the case directly to the Office of Student Rights and Responsibilities. Should the Academic Integrity Board determine that you committed an academic integrity violation, you may be assigned a grade penalty and any other sanction allowed in the Student Code of Conduct, up to and including suspension from the University.
Regarding the use of AI/ChatGPT
Intellectual honesty is vital to an academic community and for my fair evaluation of your work. All work submitted in this course must be your own and completed in accordance with the University’s academic regulations. You may not engage in unauthorized collaboration or use ChatGPT or other AI composition software.
Disruptive Academic Behavior and Student Code of Conduct
Disruptive academic behavior is any behavior likely to substantially or repeatedly interfere with the normal conduct of instructional activities, including meetings with instructors outside of class. Examples of such behavior include but are not limited to, making loud or distracting noises, using cell phones and other electronic devices without prior approval, repeatedly speaking without being recognized, frequently arriving late to class, and making threats or personal insults. The course instructor has purview over his/her class and may deny a student who is unduly disruptive the right to attend the class.
Academic Accommodations Statement
Academic accommodations may be available to students, including access to assistive technology and testing accommodations. Students should contact Disability Support Services (DSS) to discuss possible assistance during their recovery period. DSS can be reached at (252) 737-1016 or Dss.dept@ecu.edu. Use the following link to file with the Department for Disability Support Services: https://accessibility.ecu.edu/students/
Pirate Safety Guide
https://oehs.ecu.edu/wp-content/pv-uploads/sites/375/2019/03/Pirate-Safety-Guide.pdf
Emergency Weather Statement
In case of inclement weather or emergency, ECU will post information at the following website: http://www.ecu.edu/alert/
Continuity of Instruction
If face-to-face classes are suspended due to a catastrophe or severe other event, I will do my best to continue instructing those who can participate. When classes are suspended, you will receive an email from me and an announcement on Canvas; both will detail how we will proceed.
Missed Instructional Time in the Event of a Disruption:
Making up missed instructional time in this course will follow ECU’s Policy for Making Up Missed Instructional Time Due to Suspension of Instruction.
Assessment
In this course, you will be asked to participate in assessment activities that are not graded as part of your course requirements.
Caveat Statement
This syllabus represents a written contractual agreement between us. Occasionally, revising it to meet students’ needs may be necessary. I reserve the right to modify it if the need arises. You will be notified in advance.
